How to Modify Downward Dog for Tight Hamstrings
Downward Dog is often taught as if the heels must reach the floor and the legs must lock straight, and that single expectation is what makes the pose miserable for anyone with tight hamstrings. The fix isn’t more stretching before class — it’s changing the shape of the pose itself.
Bend Your Knees
The most useful adjustment is also the simplest: let your knees bend generously, even a lot, until your spine can lengthen from your hips to your shoulders without rounding. A long, straight spine with bent knees does more for your hips, shoulders, and core than straight legs with a curved lower back. Try pedaling the feet one at a time, bending one knee while pressing the opposite heel toward the floor, then switching, rather than holding both legs locked the whole time.
Shift Your Hand Position
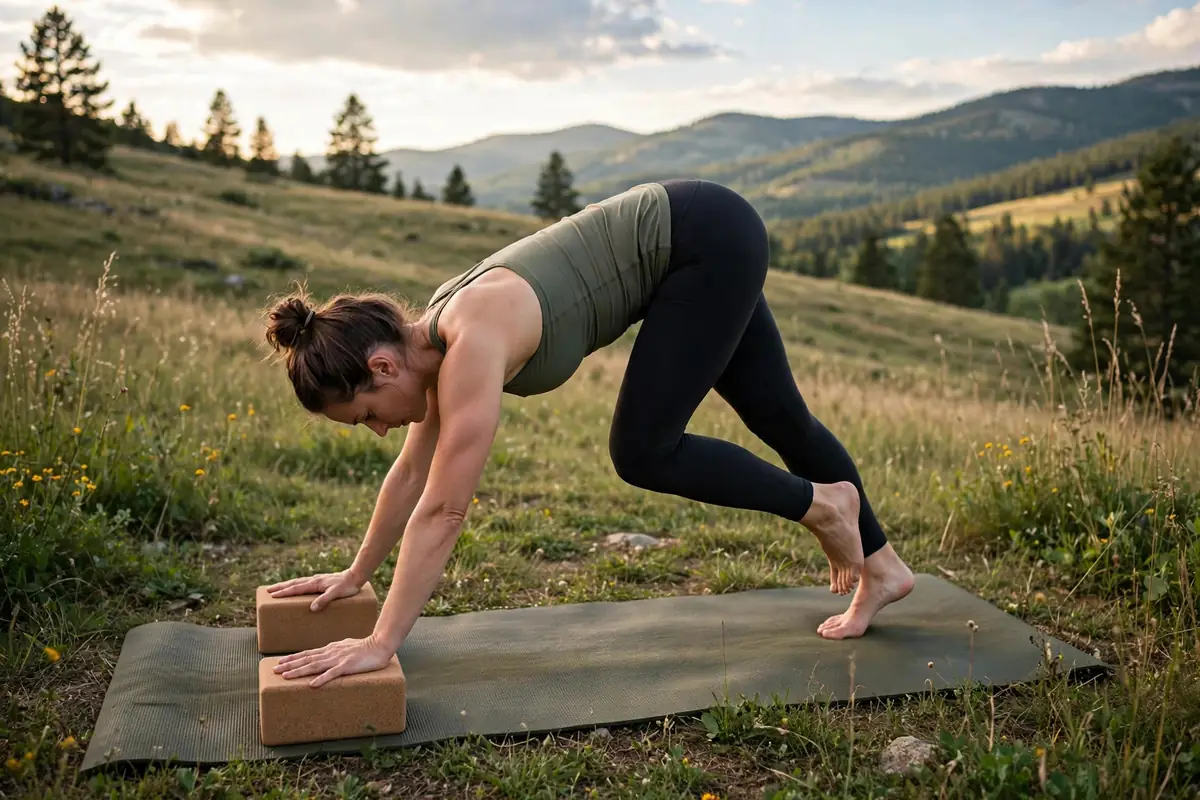
Widening your stance and walking your hands slightly further forward than feels intuitive gives your hamstrings more room and takes pressure off the lower back. A yoga block under each hand, or even a stack of thick books, raises the floor toward you, so the spine can stay long instead of rounding to make up for tight hamstrings underneath. Some studios keep blocks on hand for exactly this reason, so it’s worth asking before class if you don’t see them out.
Try a Wall for Feedback
If it’s hard to tell whether your spine is actually staying long, practicing near a wall can help. Set your hands on the floor a few feet in front of a wall, walk your feet up the wall until your body forms a rough L-shape, and bend your knees as needed to keep your back flat. This takes the guesswork out of the pose and lets you feel what a long spine is supposed to feel like before trying the full version away from support.
Watch for Warning Signs
Some pulling through the back of the legs is expected. Sharp pain, pain that runs down the leg, or a pinching feeling behind the knee is not, and is a sign to back out of the pose rather than push through it. If pain shows up in the same spot every session despite modifications, a physical therapist or a licensed yoga instructor can look at your specific alignment and offer adjustments that general advice can’t.
Building flexibility over time helps too. A short warm-up before you stretch makes tight muscles more receptive to lengthening, and understanding what normal muscle soreness looks like makes it easier to tell the difference between productive discomfort and something that needs attention. The NHS guide to yoga is a good starting point if you’re new to the practice and want to know what to expect.
Downward Dog isn’t a test of how flexible you already are. It’s a pose that should adapt to the body doing it, not the other way around, and a few weeks of consistent practice with bent knees usually does more than forcing straight legs ever will.
Why Tight Hamstrings Hijack This Pose
It helps to know what is actually happening. Your hamstrings run from the sit bones at the base of your pelvis down to just below the knee. When they are short or stiff, they tug the pelvis into a tucked position, which rounds the lower back the moment you try to straighten your legs. That rounding is the real problem in downward dog, not the bent knees. A rounded spine under load stresses the lower back discs, while bent knees with a long spine distribute the work across the shoulders, core, and legs the way the pose intends.
This is why the standard advice to “just push your heels down” backfires for tight bodies. The heels are the last thing that matters. Priority order in this pose is always: long spine first, shoulders stable second, legs wherever they need to be third. Once that order clicks, the pose stops feeling like a hamstring test and starts feeling like the full-body stretch it is supposed to be.
Prop Setups That Change Everything
A few household items can transform this pose before your hamstrings ever change.
Blocks under the hands are the single most useful prop here. Raising the floor by even a few inches gives your spine the room to lengthen without the hamstrings having to give more than they have. Place one block under each hand at its tallest height to start; you can lower them as things open up over weeks.
A folded blanket under the heels works from the other end. It slightly reduces the angle at the ankle, which takes urgency out of the calf and hamstring stretch and lets you settle into the shape instead of fighting it.
A strap loop around the upper arms, just above the elbows, keeps the arms from splaying outward, which is a common compensation when the shoulders fatigue. Stable arms mean the stretch goes where it should instead of leaking into the shoulder joints.
None of this is cheating. Props are how the pose is taught in alignment-focused traditions like Iyengar yoga, where precision matters more than performance. If your studio keeps blocks out, use them freely; if it does not, ask. And if you want a broader set of beginner-friendly shapes to practice alongside this one, a short routine designed for non-flexible beginners pairs well with daily downward dog practice.
A Simple Progression to Practice at Home
Rather than attempting the full pose cold every day, work through this sequence over a few weeks. Spend a few days at each stage before moving on.
- Stage 1, wall L-shape: hands on the floor a few feet from a wall, feet walked up the wall, knees bent as needed. Learn what a flat back feels like with support.
- Stage 2, bent-knee floor version: full pose on the mat with generous knee bend, pedaling the feet alternately for the first several breaths.
- Stage 3, blocks under hands: same shape, but the raised hands let you straighten the knees a little more while keeping the spine long.
- Stage 4, gradual straightening: over sessions, let the knees extend a fraction more each week, stopping the moment the lower back starts to round.
Move to the next stage only when the current one feels easy for five slow breaths. Hamstring length changes over weeks and months, not days, and rushing the progression just reintroduces the rounding you are trying to eliminate.
How Often to Practice It
Downward dog responds well to frequency rather than marathon holds. Thirty to sixty seconds in the pose, two or three times a day, does more for most people than one long strained hold. It appears in most sun salutations and vinyasa sequences anyway, so anyone attending regular classes is already practicing it often.
One caution about timing: stretching cold, stiff hamstrings aggressively first thing in the morning can feel productive but often just triggers the muscles to guard. A minute or two of gentle movement first, leg swings, a few cat-cow rounds, makes the tissue more receptive. This is the same reason a proper first yoga class starts gently rather than demanding deep shapes from cold muscles.
Frequently Asked Questions
Should my heels touch the floor in downward dog?
No. Heel contact is a common goal but not a requirement, and for many body types it never happens comfortably. A long spine with bent knees and lifted heels is better alignment than flat heels with a rounded back.
How bent should my knees be?
Bend them as much as needed for your lower back to stay flat and long. For very tight hamstrings that can mean deeply bent knees, almost like a squat folded forward. As flexibility improves over weeks, the bend naturally decreases.
Can I do downward dog every day?
Yes, in its modified form. Short daily practice with bent knees is gentler and more productive than occasional long attempts at the full expression. Back off if your wrists or shoulders get sore, since the pose loads the upper body too.
Why do my wrists hurt in downward dog?
Wrist discomfort usually comes from dumping weight into the heels of the hands. Spread the fingers wide, press through the knuckles, and think of pressing the floor away. Blocks under the hands or a slightly shorter stance can also reduce the wrist angle. Persistent wrist pain deserves a teacher’s eyes on your alignment.
Is downward dog safe during pregnancy?
Many prenatal yoga programs include modified downward dog, often with a wider stance and support, but inversions and deep forward folds get more complicated as pregnancy progresses. Check with your healthcare provider and a qualified prenatal teacher rather than deciding from a blog post. General guidance on yoga safety is available from the NCCIH.
Conclusion
Downward dog with tight hamstrings is not a flexibility exam you are failing; it is a pose with a clear priority list, and the spine comes first. Bend the knees generously, use blocks without apology, progress through the wall and prop stages, and let the legs straighten on their own schedule. A few weeks of patient practice will change the pose more than any amount of forcing. More practical yoga guides are on the All Day Health & Fitness homepage.