
How to Do a Proper Push-Up Without Straining Your Shoulders
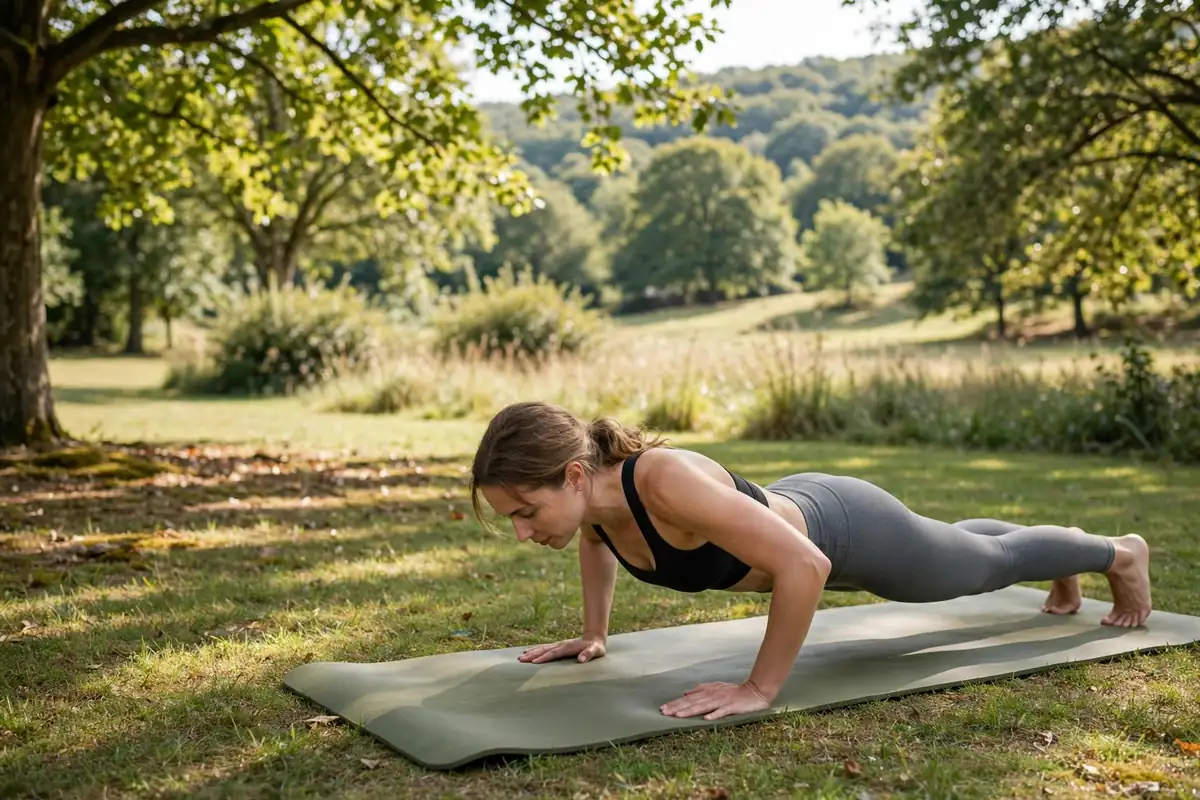
Shoulder strain during push-ups almost always comes from letting your elbows flare straight out to the sides and your hips sag toward the floor, both of which force the shoulder joint to absorb load it isn’t positioned to handle. Bring the elbows in and keep your body in a straight line, and most of that strain disappears.
The elbow angle that matters
A wide, flared elbow position — arms forming a T-shape with your torso — puts the shoulder in a vulnerable rotated position under load. Angling your elbows back at roughly 30 to 45 degrees from your sides keeps the load traveling through your chest and triceps instead of twisting the shoulder joint. This is the single biggest form fix for shoulder discomfort during push-ups.
Setting up the rest of the body
- Hands roughly shoulder-width apart, fingers spread, middle finger pointing forward
- Head in a neutral line with your spine — not craned up, not tucked down
- Core braced and glutes lightly engaged so your hips don’t sag or pike up
- Lower until your chest is close to the floor, then press back up through a full arm extension
If a full push-up on your toes causes your form to break down before you feel challenged, an incline push-up against a bench, box, or wall is a legitimate progression, not a lesser version. Reducing the range or angle to keep good form beats grinding through reps with your hips sagging and your shoulders shrugged up toward your ears.
Warming up the joint first
Shoulders that feel fine on the fifth push-up but ache on the fifteenth often just need a proper warm-up: a few minutes of arm circles, band pull-aparts, or slow scapular push-ups — shoulder blades gliding apart and together with straight arms — before loading the joint fully. A cold shoulder under load is a common, fixable cause of soreness that has nothing to do with the exercise itself. The NHS’s strength and flexibility exercises guide has more bodyweight moves that build the same pushing strength.
When to stop and get it checked
A pinching or sharp pain at the front of the shoulder, pain that lingers hours after training, or a shoulder that clicks painfully under load are reasons to stop and see a doctor or physical therapist rather than adjusting hand position and hoping it settles. Working through joint pain to hit a rep count is how a manageable issue turns into a longer layoff.
Try one thing this week: film yourself from the side for a single set. Most people are surprised by how much their hips actually sag under fatigue.
Why Push-Ups Bother the Shoulders in the First Place
The push-up looks simple, but it asks a lot of the shoulder joint. Your shoulders are the most mobile joints in your body, which makes them versatile and also vulnerable. During a push-up, they bear a large share of your body weight while moving through a wide range of motion, and the rotator cuff muscles have to work constantly to keep the head of the upper arm bone centered in its shallow socket. When form is good, that load is distributed across the chest, shoulders, triceps, and core. When form breaks down, the front of the shoulder takes more than its share, and irritation builds up rep after rep.
Three mechanical errors cause most of the trouble. The first is flaring the elbows straight out to the sides, which narrows the space inside the shoulder joint under load. The second is letting the hands drift too far forward, past the line of the shoulders, which shifts stress to the front of the shoulder. The third is sagging hips or an arched lower back, which changes the angle of the whole movement and dumps extra load onto the shoulders. None of these hurt on rep one. They hurt on rep one hundred, which is why shoulder-friendly push-ups are about habits, not heroics.
The Step-by-Step Setup for Shoulder-Friendly Push-Ups
Start on the floor in a plank position, hands placed just outside shoulder width and aligned with your mid-chest, not up by your face. Spread your fingers and press your palms flat; cupped hands create an unstable base. Before you move, set your body like a plank: squeeze your glutes, brace your core as if someone were about to tap your stomach, and keep a straight line from head to heels. This full-body tension is what turns the push-up into a core exercise as well as a pressing one, and our guide to building core strength without endless crunches explains why that bracing matters far beyond push-ups.
Now lower yourself with control, bending the elbows back at roughly a 45-degree angle from your torso so your body makes an arrow shape rather than a T. Actively screw your palms into the floor to engage the lats, the big back muscles that stabilize the shoulders during pressing. Keep your neck neutral by looking slightly ahead of your hands. Lower until your chest nearly touches the floor, pause briefly, then press back up to full extension. Breathe in on the way down, breathe out on the way up, and never rush the descent: two to three seconds down builds control that protects the joints.
Beginner-Friendly Progressions That Protect Your Shoulders
If full push-ups from the floor cause shoulder discomfort or your hips sag before your chest fatigues, you are not ready for the full version yet, and that is completely normal. Training an easier variation with perfect form builds the strength and motor patterns that make the full push-up safe. Most good beginner workout routines include push-up progressions for exactly this reason.
Start with incline push-ups: place your hands on a sturdy bench, a step, or a countertop. The higher the surface, the easier the rep. Master 3 sets of 10 to 12 clean reps at one height before lowering the surface. Next, try knee push-ups, keeping the same straight line from knees to head and the same 45-degree elbow angle. Then try eccentric push-ups: start at the top in full plank and lower yourself as slowly as possible, then drop to your knees to press back up. The slow lowering builds the exact strength the full movement demands. Only move to full floor push-ups when you can do 8 to 10 controlled reps of the easier version without shoulder discomfort and without your form breaking down.
How to check your own form without a coach
Film yourself from the side with your phone. Watch for the three errors from the first section: elbows flaring to 90 degrees, hands drifting forward of the shoulders, and hips sagging or piking. If you spot any of them, drop back one progression level for a week or two. This kind of self-review is a skill worth building for every exercise, and our guide on how to tell if your form is off without a trainer watching covers mirrors, video, and feel-based cues in more depth. If shoulder pain persists even with good form on easy variations, or if you feel clicking, catching, or sharp pain inside the joint, stop and have it evaluated rather than training through it. The MedlinePlus overview of exercise and physical fitness reinforces the same principle: exercise safely, use proper form, and listen to your body.
Frequently Asked Questions
Why do my shoulders hurt when I do push-ups?
The most common causes are flared elbows, hands placed too far forward, and sagging hips, all of which shift excess load onto the front of the shoulder. Dropping to an easier variation and fixing those three positions resolves the discomfort for most people. Persistent sharp or deep joint pain deserves professional evaluation.
Should my elbows be tucked or flared during push-ups?
Neither extreme. Aim for roughly a 45-degree angle between your upper arms and your torso. Fully flared elbows stress the shoulder joint; elbows pinned tight to the ribs shift the load awkwardly and reduce chest engagement. The 45-degree position balances muscle activation with joint comfort.
Are knee push-ups effective or just a cop-out?
They are genuinely effective. Knee push-ups train the same muscles and the same movement pattern with less load, which makes them an ideal stepping stone. Many people build up to full push-ups faster by mastering knee push-ups first than by grinding out sloppy full reps.
How many push-ups should a beginner aim for?
Quality first, numbers second. Start with 3 sets of as many clean reps as you can do with perfect form, even if that is 5 per set on an incline. Add a rep or two per set each week. Reaching 3 sets of 10 to 12 clean full push-ups is a solid beginner milestone.
Can push-ups damage the rotator cuff?
Push-ups done with good form are generally safe for healthy shoulders, but chronically poor form, especially flared elbows under fatigue, can irritate the structures around the rotator cuff over time. If you have a known rotator cuff issue or prior shoulder injury, check with a clinician or physical therapist before adding push-ups to your routine.
Conclusion
Shoulder-friendly push-ups come down to a handful of positions held consistently: hands under the mid-chest, elbows at 45 degrees, lats engaged, body in a straight line, and a controlled descent every rep. If the full version is not there yet, progressions like incline and knee push-ups build the same strength without the strain. Film yourself, fix what you see, and progress only when form holds. Do that, and the push-up becomes what it should be: one of the best upper-body exercises you can do anywhere. More form-focused training help is waiting at All Day Health & Fitness.